Saturday, 6 September 2014

Costume-making 101: The End Drawers Nigh(er)

Hello again and following a hectic few weeks of Real Life getting in the way of the important business of costume-making and then writing blogs about it, we're back in business and ready to finish up the latest item in my dressing-up box: the brown Assassin's Creed overcoat.

So when we finished up last time I'd discovered the arcane art of sewing machine embroidery - witchcraft I tell you - to decorate my projects.  I'd tried a test piece on a scrap of my corduroy fabric and it had gone quite well, look:


I'd planned to use this piece in my completed coat, but after drawing in the cutting lines I realised how wonky the design was - I didn't mind the roughness of it, after all it's supposed to look hand embroidered, but my OCD wouldn't let me use a design that was off centre and tilted.  I also wanted to use some kind of backing to give the piece some more body.

Breaking out my denim lining material I cut out the piece of fabric I needed to the correct size and shape (more on the hood pattern to come...) and started to mark out the design.  It was based on the eagle emblem found on Connor's hood in Assassin's Creed 3, with some modification.  Typically, I didn't take a photo of the completed marking out, just the completed piece, but following the marking out I pinned the lining to the outer corduroy and starting embroidering...


It's hard to see in the photo but after drawing out the pattern I marked points along each of the lines where i needed to adjust the width of the stitching to create the taper - for example on the outer lines of the "wings" I started out at a width setting of 4 (out of 6), then around a third of the way down  turned this down to 3, the for the final third down to 2.  The 2 setting seemed to be thin enough to define the points without being too thin to see properly.


 Here's the design from the front - ignore the bumps, they came out following liberal use of a hot iron.  Once completed I cut around the denim pattern piece around 6mm out and again with the use of the trusty steam iron turned over the edges to create a neat piece ready to add to the hood.  Going against my belief of not using glue to create costumes, I glued these raw edges down as they were quite small an fiddly.  the result?


I was pretty pleased with the result, but thought it could use some more definition.  So, back onto the sewing machine, it was time to add a line of stitch around the whole design:


A small detail, but I think it really helped define the design.  I put this aside for now along with the rest of the hood pattern to complete later.


So, back to the coat then and time to start adding some buttons.  I ignored the original pattern as far as the button placement was concerned as I wanted to pin the lapels back on themselves with a row of buttons.  After playing around with button placement and numbers I settled on a design I was happy with and started opening the buttonholes, following the method in previous entries:


Next, the buttons themselves.  For rows such as this the method I've developed to ensure a flat, even row is to first place the top button of the row, then the bottom one, making sure the placement allows the lapel to lay flat when turned back.  Once turned, I used pins to mark the location of the remaining buttons, along with a tape measure to ensure they were a uniform distance apart:


Sew, sew, sew, more hand sewing buttons in place and we end up finally with the finished article!


The coat tails in the final picture are held up through two buttonholes opened up in the lower edge, allowing the coat to be worn either long or "for marching," as this design is described in military clothing design manuals, or, my particular favourite as "in the French style."

So, coat done, yes?  No, actually.  I still need to add more buttons (really?) to the cuffs, plus complete the hood, which I've mentioned a lot but still haven't shown you how to make.  I'll cover these next time, along with some glamour shots of the finished coat.  Right now I have to finish photographing the current coat I'm working on, ready for a future blog post...


Until next time.

Tuesday, 12 August 2014

Costume-Making 101: It's all in the details...


Well time sure does fly when Real Life comes calling - who'd have thought that we could all go so long without the latest in my costuming (mis-) adventures?

So what's been keeping me away from the laptop and the blogging I hear you ask?  Well, in no particular order - new mobile phone and contract, sorting out new wireless broadband, buying an Xbox One (yay!), pre-university trips to London with the little 'un to take photos of stuff, acquiring new patterns, buying fabric and... oh yes, finally getting my hands on a Kai Arts Play Edward Kenway.  More on that when I figure out vlogging.  

Enough ado, let's look at where we're up to with the overcoat shall we?  When we left the non-stop sewing action last time around the coat was together, it fitted and I was pretty pleased with the results up to this point.  Construction-wise the coat was 90% done, with just a few small additions to complete before moving on to the detailing and the hood.  

First off, cuffs.  I had the sleeve ends as raw edges at this point and still needed to add the cuff turn-backs from Simplicity 2333 to complete them.  They were fairly easy to attach, though I should've followed the pattern and added them when constructing the sleeves as access is more difficult when you're working around the bulk of an overcoat...

So here's the cuffs added with a simple machine stitch:


Both the outer fabric and lining denim were attached at the same time, then turned correct side out and hemmed together to finish the end of the sleeve:


And here they are finished on the coat itself, ready to move on to the detailing:


With the sleeves now finished, it was time to move on to the fun part - the detailing and finishing, plus the hood.  These are the parts I really enjoy on a project as the light at the end of the tunnel is more than a faint glow and you're fairly sure that it isn't the train...

I'd had in mind to use silver-coloured military-style buttons for this project, along with a deep red trim around the button holes and red embroidery to tie it all together.  So, some eBay-ing later and a few days' wait, I ended up with my buttons and some embroidery tests for good measure.  The buttons themselves are just a pewter material, but this did mean I could get 40 assorted buttons for under £9 delivered.  Here's what I received, along with my embroidery test:


One thing to note here - if you're going to be embroidering with a machine, make sure you test on a sample of the actual material you'll be adding the finished design to.  The swatch above includes both the corduroy and denim and you'll notice that the top line of stitching is much tighter and dense than the lower one; the lower line was tried first before realising my machine could embroider even more tightly than I thought.  Just for some early pay-off, I sewed two buttons to the back of the coat to see how they looked:


Another thing here - make sure for "historical" based patterns, always buy buttons with a shank attached - ones with a protruding peg on the back to sew through - rather than ones with two or four holes, they just look too modern.  My early tests on this project used four-hole imitation horn buttons and they just looked odd. 

Right then, the buttons looked good, time for some button-holes!  I used to dread these, but after a couple of tries on my test patch in the deep red thread I'd chosen, I ended up with this:


First collar button-hole added!  I sorted out the other side and had to work out where the buttons would go.  For this, I found a method that seemed to work.  Try the garment on and position the button-hole to where it would normally sit when worn.  Next, work out the direction of tension the button would be under when worn; in the case of the collar, this would be upwards, as the collar naturally wants to unfold.  Take a pin and push it through the button hole just slightly towards the end where the tension will sit, in this case, the bottom of the slant.  This way, once the garment is worn, the button will sit nicely in the corner of the button hole, leaving your nice complimentary stitching exposed to one side. 

To open the button holes I liberally applied a line of Fray Check (I think that's what it's called) to both sides of the fabric layers, including the stitching on both sides.  Once dry, you can open the hole with a chisel or craft knife (being VERY careful) and trim off any stray strands with a small pair of scissors.  

So, before I call it a day with this entry, it was at this point that something occurred to me - if I can machine embroider straight lines really simply, I wonder if I could vary the width while sewing to create a tapered line?


Turns out, I could.  So, if I could do this, could I do the same with curved or hand-drawn lines?  Cue appropriate test patch:


Pretty happy with that as a test!

Alas, that concludes tonight's updates - the missus is done with Zumba and little 'un is vlogging and won't remember to eat until I put dinner in front of her so I must down tools for the night.  Check back soon for a full explanation of my newly discovered love of machine embroidery, completing the rest of the button holes and the start of the hood saga!

Cheers all, until next time.

Saturday, 19 July 2014

Costume-Making 101: The Coat Maketh the Man

Hello again and welcome to a somewhat delayed entry in my costuming adventures in and around the Asssassin's Creed costumes I'm working on.  Since we last left the action another bout of illness and general life has made progress a little slow, but I'm happy to report that we're back in top gear and surrounded by fabric off-cuts and pattern pieces once again.

So, having finished up the top part of my new coat in my dyed corduroy and denim, it was decision time as to how to progress on the lower half - whether to build it as per the pattern for a long, trench-coat look or to carry on with my attempt to recreate the pattern of the Connor Kenway coat from AC:3.  This actually turned into a bit of a dilemma, slowing down production for quite a few days as I swayed back and forth as to which way to go with it; to stay faithful to the original vision of the project and replicate the in-game coat or to stick with a pattern I knew and work on something original.  Hmm.

While I liked the idea of recreating the Connor coat in a new fabric, in the end I decided to stick to a tried and true pattern, mainly because if it all went wrong it would be very hard and time-consuming to order in more fabric from Germany, dye it to match and re-cut all the pattern pieces.  Fear not though, I've already teed up the Connor pattern for a future build so more on that in the months to come!  Sorry family...

One thing I wanted to include with my coat was a split in the skirt to allow for easier movement and to make the design more my own, so after cutting all the pattern pieces I started to assemble the skirt.  The side and back panels went together as per Simplicity 2333's instructions, but when it came to attaching the back seams, I only stitched them together for about a fifth of the length, as shown below:


Once this was finished off, time to add the pockets - as anyone who's been to a convention will tell you, the most frustrating thing about wearing a costume is the lack of somewhere to keep your wallet, cigarettes and business cards...  The pockets were placed as per the pattern, but I decided to line them with the denim fabric to give them more stability.  I'll run through how I did this quickly.  Warning, lots of pictures and lots of time to do this, especially given that no-one but me will see it...

First off, cut the outer fabric to size and the lining fabric to the same size, minus the seam allowance:


To ensure no stray edges inside the finished pocket, fold over and iron/press the seam allowance so it is a double thickness and half the width, with the raw edge touching the lining fabric:


Next, fold and press the seam allowance over on itself again so that it overlaps the lining fabric.  This will ensure the outer fabric's cut edges are enclosed before sewing in place and will ensure no loose threads or fraying from the inside.  Then, run a line of stitching along the top opening of the pocket to finish the top edge:


I pinned the turned over lining in place after pressing to hold them securely and trimmed any folds that were too bulky:


Now position the pocket on the coat and pin in place.  I left the pins from the previous stage in place to ensure that nothing moved during assembly.  I ran a stitch around the pocket edges to secure it in pace, around 6mm in from the edge:


Make sure to double stitch the seam at the top where the pocket opens and try not to dip the pocket in your tea like I did before attaching...

Lastly, I ran a stitch around the very edge of the pocket using a zipper foot, resulting in a double hemmed extra-strong pocket for my coat:


So, pockets attached (minus a flap, more on this to come), I was left with two halves of a coat, ready to attached and finish.  The lining went in as per the pattern instructions, with some modification around the back split.  The fabric for the lining is a dark red-wine (mmmm) coloured poly-cotton with a slight linen weave to it, and against the advice of the pattern I stitched this along the entire length of the top where it joins the body; I'd tried to follow the pattern once before and have my own way of finishing it off - I find the Simplicity instructions confusing and illogical.  Here's a bad photo to illustrate:


Now it was simply a case of attaching the two together, remembering to include the two gathers on the back.  Some pinning, adjusting and sewing later, we have this:


The fit is a little off as I'm having to hold it closed at the front, so here we are again on a mannequin torso, stood on my ironing board:


I was very pleased with how well the coat held its structure across the top, thanks mainly to the denim lining.  The lower half has very little weight as both the corduroy and the lining are very light and floaty, meaning a great hang while being worn.  In a previous attempt at this pattern I'd used a heavy lining through the skirt part and it ended up pulling the whole coat out of shape when worn due to the weight of the lower half.

So, many weeks of work, a lot of cutting, many, many cups of tea later and we have the basic structure of the coat finished.  Next time I'll document adding the cuff turn-backs, finishing the seam between the body and the skirt plus the start of the (extensive) detailing, include almost 30 (!) buttons and button-holes I had planned.  Oh, and more on the hood to come:


Enjoy the sunshine and more to come!

Tuesday, 1 July 2014

Costume-making 101 - Decisions, decisions, decisions...

So then my costume-making friends, when we left the action last time (pre the bout of horrific man-flu-mixed-with-hayfever-and-no-sleep-or-food-for-two-days that struck me down over the weekend) I was on the cusp of having to decide which way my new project was going to proceed - an AC3 coat replica, or an ACU (Assassin's Creed Unity) coat in the style of the new main character, Arno.  Wow, I have such problems...

While trying to decide, I made a start on a new coat.  See?  Responsible decision making; charge ahead with something regardless and make it up as you go along!

So, having decided to crack on with something rather than nothing, I ordered in some corduroy from a place I found in Germany, very reasonable at £4.59 per meter instead of the usual £15.00.  Great, I thought, until it arrived.  I'd missed the words "worn appearance" in the description.  It meant this:


Basically, it looked as though the fabric had been badly tie-dyed in a brown-orange over a white base.  This is how it looked after washing...

No problem, thought I, Dylon will hold the answer.  Three packs of dark brown dye, several 40 degree wash cycles and a day of drying later I was happy with the colour.  For reference, I was going for a colour combination (whichever way the project went) based on the brown/red/blue colours from AC3:


I (finally) had the brown outer in the form of a good earthy needle cord, now I needed the red and the blue.  For added texture and interest I'd already picked up some indigo denim from my local supplies, plus some burgundy poly-cotton to work in.  The hood, I'd already tackled:


After already failing at it once:


More on this when I cover the finer points of construction.  

So, sticking with my Simplicity 2333 pattern from last time, I set about building the top half of the coat, as this would be the same whichever way the build progressed.  I cut and assembled the front, back, top sleeve, under sleeve and collar from both my denim and my corduroy, resulting in this:


The brown outer, complete with denim collar and interfacing, which I later removed as it prove unnecessary and unreliable with the rigid denim lining.


And this, the denim lining, turned inside out for pressing on the sleeves:

Next up, let's get theses puppies together, trim seams, hem, press, turn in the right way, press and sew again to finish all the edges off nicely:


Cool huh?  I was very pleased.  The denim lining proved rigid enough to hold the collar and turn-backs in place with no interfacing, plus the shoulders sat really well.  A note here on set-in sleeves, as per above: learn how to do them, they look fantastic and will only take a couple of tries if you've got a little experience under your belt.  To me, set-in sleeves add a really "professional" look to your work and sell it as a garment, rather than just a costume.  

Sadly I have no pictures of constructing the set-in sleeves, but this was my second and third attempt (shell then liner) and I managed them all (four in all, two sets of two) without a single catch.  Go me.  If possible, have someone show you how to do it, otherwise learn by video - Google produces some excellent results.  

I used the one below, plus some common sense and reference books, especially the invaluable "The Sewing Book" by Alison Smith from DK Books - buy it, you won't regret it.  As I said, I'd done one set before this (with a couple of catches) so work slowly, methodically and don't be afraid to alter and re-sew if needed:

https://www.youtube.com/watch?v=9QSw8SwH9V8

Next time I'll be looking at which way I decided to go the the coat, AC3 or ACU-inspired, so for now, here's an in-progress shot of the coat body and the proposed hood:


Thanks for looking guys, more to follow in the next week or so.


Until next time.


Wednesday, 18 June 2014

Costume-making 101: Post-Comic-Con Hang-ups and the Plan Ahead

So, here we are a few weeks after the big event, fully rested and fresh from a couple of weeks of not blogging, not making anything and giving Assassin’s Creed 3 another try.  Prepare for a complete 180, but I now think it’s a pretty decent game all in all – don’t get me wrong, it’s no AC2 but worth a punt for the right price.  Just stick with it past the first 4,000 boring hours and it will start to get good.  Promise.

Where are we now then?  Well, Comic-Con first off.  This was the second event we’ve all been to and I was pleasantly surprised by the huge turn-out on the Saturday and the consistently high standard people achieve for the costumes, be they shop-bought or painstakingly hand-made.  Everyone we met (and had about a million photos with) was enthusiastic, polite and genuinely interested and discussing all things nerd; loved it.  However, if you’re listening Comic-Con organisers, how about next time around we try filling all that extra space with some more/different stalls?  Hard to believe I had a bonus from work burning a hole in my pocket and I managed to spend zero.  Well apart from about £20 on disappointing noodles.

Anyway, what did we learn from Comic-Con as far as costumes are concerned?  Well, lots of people go dressed as an Assassin’s Creed character.  A lot.  Mostly as Connor from AC3 (now a good-ish game, but always a fantastic costume) and mostly in some variation of shop-bought costume, which generally look quite good.  My friend Scott’s Ezio-esque outfit attracted a lot of attention, as did my other half’s and step-daughter’s due in no small part to the fact that they are girls who Cosplay Assassin’s Creed, which seems to be a bit of a novelty still.  The one “weak” link in the chain was my costume.  I was happy with the quality of work and the general “historical” nature of it – a lot of research and design went into getting looking right.  So what was wrong with it?  No flair.  None.  I looked really hard for it as well and I couldn’t find any.

Bugger.
So naturally with the event out of the way I set to with designing the new coat for October.  No rest for the wicked.  Given the abundance of Connor/AC3 costumes on show I took my cue from the masses and decided to build an AC3-inspired coat, but I a more realistic way.  There are plenty of patterns online for this, but I wanted to do something individual to make it stand out.  So, time to break out the crayons and canvas and get cutting!

Base Pattern


After some searching online and through the Big Drawer of Patterns I decided to base my new project around Simplicity 2333, widely referred to as the Captain Hook pattern.  I’d used this before for my first AC3 coat largely unaltered, save for the sleeve attachment as I couldn’t figure out set-in sleeves at that time (more on this later), plus the added hood.  This was produced in a blue and white drill cotton, and turned out ok.

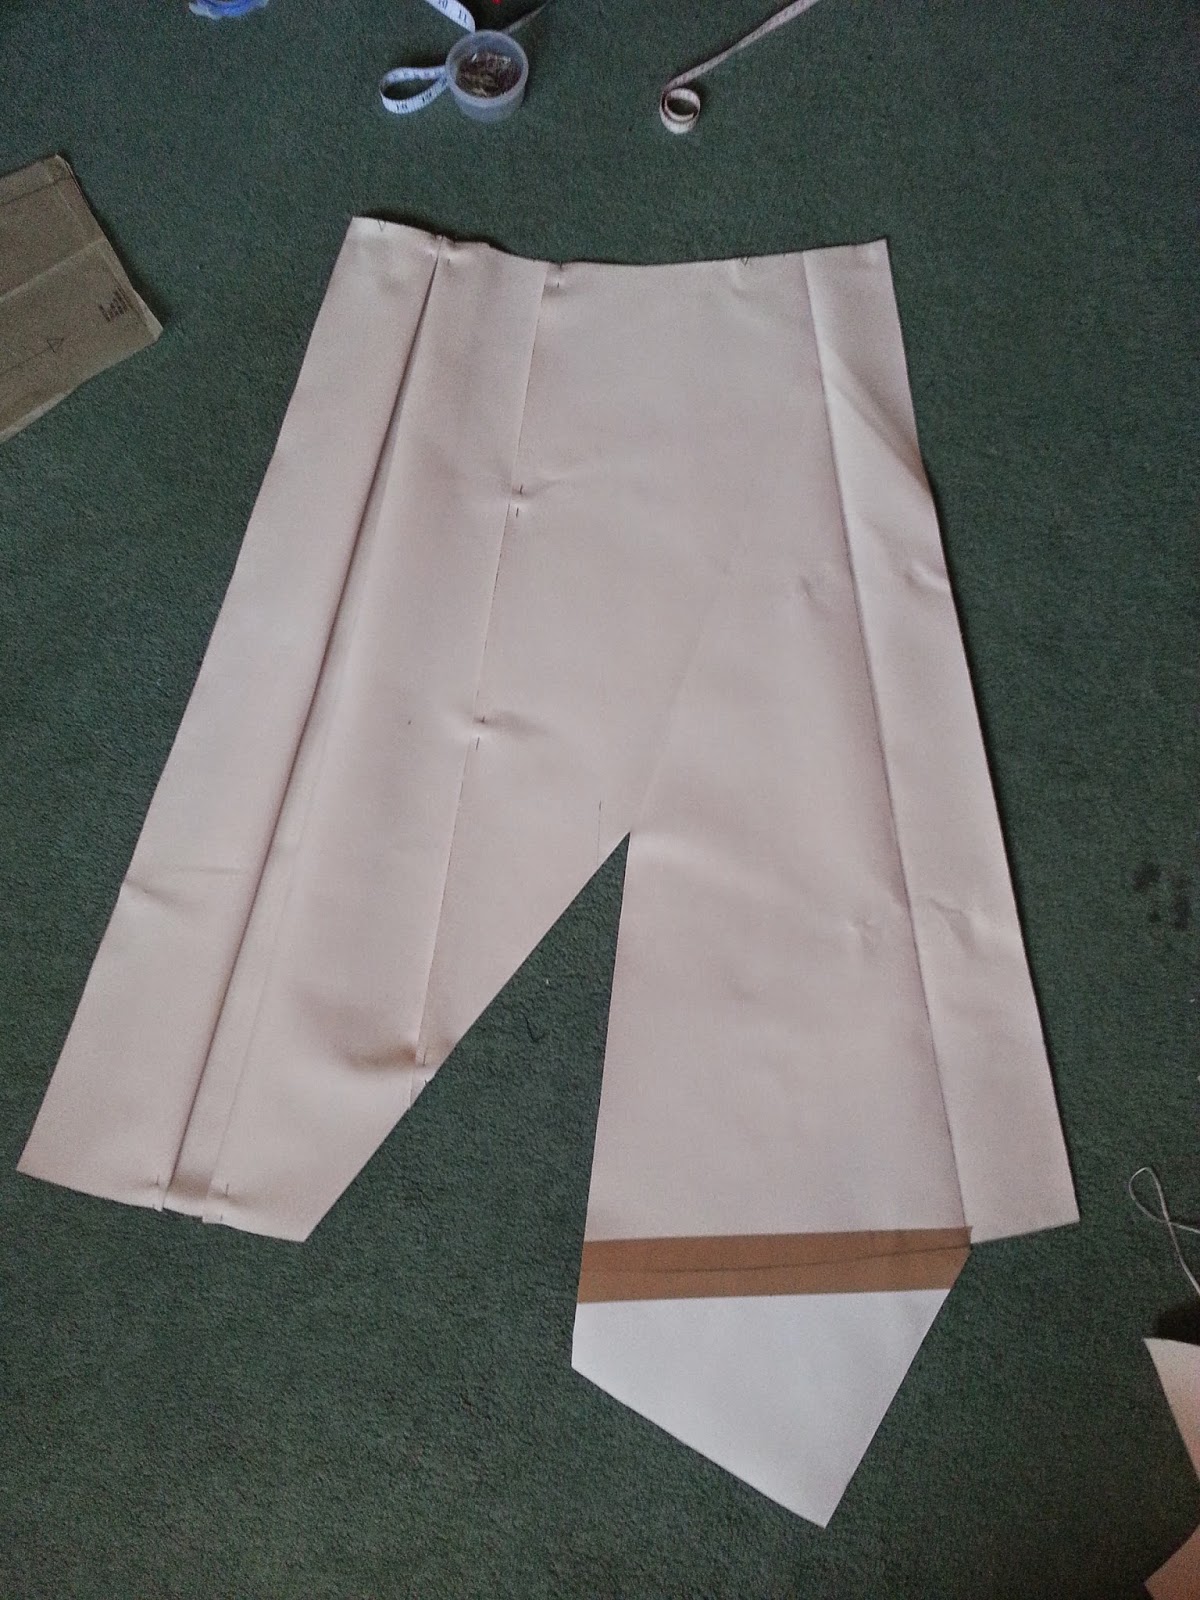
This time around I planned to use the upper body and sleeves in their original state and then adapt the two skirt parts to give the shape I needed.  Rather than destroy the pattern I had, I sent about creating a canvas replacement, made from a donated roll of printing canvas I rescued from work.  Some measuring cutting, re-cutting and copious study of an AC3 statue I had on the shelf and I came up with the following:


The idea behind this is that the tab on the far right turns back and buttons down along the whole length to give the blue turn-backs, then the large extension folds back over itself and buttons to the rear of the coat tales, giving this:


I believe this is fairly close to what is being represented in-game and it differs somewhat to other patterns I’ve seen out there.  Please feel free to use and adapt this idea, but as with anything credit for the idea would be appreciated.  The back portion of the skirt overlaps itself to create the buttoned recess we see on the back of the Connor coat so rather than simply sew a contrast piece over the original fabric, I decided to divide the rear skirt into three pieces, to create a more believable overlap.  And a lot more work, of course.    Here’s where we end up, following another mod to the leading edge:


I was feeling pretty pleased with myself at this point – a custom patern for a tricky coat design, fabrics on order and my colours pretty much down, plus a completed hood, which I’ll show you next time around.  And then something bad happened.  Or rather, something very good, which was also bad; I watched the Assassin’s Creed Unity trailer from E3.  Then I watched the making-of video.  Then I watch the co-op gameplay video.  Then, I decided to buy an Xbox One and the game the day of release. 
And I fell in love with Arno’s coat…
Now what?  Ah yes, spoilers: 


More to come folks, will most likely be moving the blogs to the weekend rather than mid-week so stay tuned!  Oh, and Blogger appears to be playing up, so apologies for the poor format...

Until next time.