Sunday, 15 February 2015

Costume-Making 101: The Hoods Have It

Hello again and this week I'd finally like to take a look at the hood designs I've been working on over the past few weeks.

Now regular readers (there must be some out there...) will of course remember that some time ago I' set myself the challenge of coming up with a design for an Assassin's Creed hood that held its shape, looked correct, but didn't feature any "cheats," such as wires, Velcro, etc.  My first crack went fairly well, relying mostly on layers of interfacing and lines of stitching to create structure.


As it happened, working from scratch on the templates, the hood turned out to be too big for me to wear without it looking a little silly - hopefully I'll be able to adapt it for someone else to use.  Despite all of panel lines on the shell of the hood, the actual pattern is pretty simple, based in part on the hood of a coat I own.  


To clarify, the parts are as follows:

1. The centre back part of the mantle, which will button to the coat
2. The centre of the hood itself, which runs from the base of the neck over the head
3. Side panel
4. The sides of the mantle, which sit on the shoulders

So a fairly simple pattern, but once I'd added in the panel details, doubled up some of the details etc, the  final part count for the shell was pretty high:


So, one hood under my belt, where to next?  I'd dabbled in the past with the fantastic pattern designed by Yulittle on Deviantart's website, which I'd used for the little 'un's coat, plus another white version, which I expertly modeled in a previous blog post:


I was pleased with how these had turned out, but really wanted something of my own design to wear to this year's events.  So, break out the crayons!

The Brief: create a simple hood pattern that can be adapted, added to or scaled to fit the majority of people.  

The idea was to create a design that could be created from two panels for the hood itself, with a third part to act as a mantle over the shoulders.  I wasn't going to use wires to keep the front opening in place, so trial and error it was.  Following a few glasses of liquid inspiration, one evening while the girls were out, I set to creating a pattern.  

Having been playing through Assassin's Creed Unity at the time, I decided to make things complicated for myself and go for something that resembled the "Sans-Culottes" hood from the game, featuring the Medieval-looking tail on the back.  I had some corduroy laying around from a previous project, so after cutting two rough panels, I pinned them together and proceeded to adjust them with pins, wearing it in the mirror.  A small warning here, be careful when pinning things onto your head after three glasses of wine.  Enough said I think. 

After some refining, re-drafting and test hoods, I had the following pattern:


Some more sewing time later, I'd put together the finished hood.  It was constructed using red cotton twill (to match the in-game reference), lined with cotton calico and bias trimmed in dark blue.  A bit like this:


You can see the "tail" is pinned down to give a neater look and the small tucks to help gather the hood into a more fitted shape.  In the end it turned out a little too large for me to use, but a useful learning tool.  

From here I reasoned that a more fitted approach was needed, along with a wider opening across the bottom of the hood at the front - my original design gathered the front together in a similar way to modern hooded coat when buttoned.  So, out came the scrap material, the pins an the crayons again, and I came up with this:


Once again I went on to construct the hood using red cotton twill, with a matching cream fabric at the front as a contrast.  Inside, it was lined with cotton calico again, with a small tuck in the front edge to pull it into shape around the opening - you can see its position in the photo above - on the side panel piece there are two gather lines, giving me this:


The front opening is bias-bound, with the mantle still needing to be finished.  Alas, I don't think this one will see use either, mainly as one too many people have commented on its Santa-esque qualities...

Third times' the charm then, which I adapted slightly, pulling the top of the side panel down and including a small, central dart to help define the shape.  With the second hood above, I'd interfaced the front cream-coloured stripe and the mantle to help add structure and with my third attempt, I planned to use it a lot more.

So, some more patterning later, the final design looked like this:


I decided in the end to match the fabric of this hood to the coat I'd be using it with, so went with my usual dark blue cotton twill, lined with a matching deep red twill, with interfacing through the front opening and the mantle.  I'm cursing myself for not photographing the construction, but here is the finished result:


The font opening has been heavily interfaced, building up in narrowing layers up to the applied embroidered piece, where it is approximately six layers thick.  The embroidered panel has its own interfacing, plus the additional stitching around the panel help create a very structured finished.  The raw edges have all been bias-bound and stitched using the "rustic" pattern from the coat.  I should point out that my new polystyrene friend in the photos has a differently shaped head to me, so the hoods don't sit exactly as they do on me, but they're close enough.  

So there we have it - I've not included pictures of the other eight or nine half-finished hoods I showed in the previous post as they're pretty much the same design but incomplete as I changed dimensions and details.  I'll cover the construction of the next hood in greater detail, once I can get some time sorted out with its future owner.  Please feel free to use, adapt and improve the designs above - I'd love to see results of what everyone else can add to them!

I'll leave it there for today, other things to do and probably more sewing I need to get on with.  There has been some progress on a couple of other projects, but I'll tackle those next week. 

Until next time.

Sunday, 8 February 2015

And So It Goes On

As February begins I feel it's time to take stock of where we're up to with the current projects I'm messing about with - May's deadline is just peeking its head over the horizon so I need to keep focus and get on with things...

As I'm still waiting on delivery of my polystyrene mannequin head, so the hood side-project will have to wait for another week for its own post, so lets see where we stand on the other bits and pieces!

The Coat:

Finally completed the bias-bound edging of the coat!  After nearly ten meters (yes, ten) of bias binding the coat is now enclosed and essentially ready to wear; that said we're far from finished with this one...  I've spent some time this week deciding how best to tackle the turn-back lapels and skirt sections - there's buttons, ties, eyelets, hooks, pressing, press studs, rivets, the list goes on.  One intriguing idea that I read about last week comes from the uniforms of Prussian infantry during the Napoleonic era: indulge me for a minute.


French line infantry coats featured turned back skirts that could be buttoned back for ease of movement during long marches; indeed a feature of many Napoleonic-era uniforms, making for a smart unbuttoned skirt for parade and functional garment when marching (see above - not period, but it'll be do for now).  As time went on and the wars took their inevitable toll on funds and resources, these turn-backs were eventually replaced with coloured fabric panels applied directly to the coat to give the impression of turn-backs and the attractive flash of colour they added, but without the expense of using extra fabric and labour time.  Now, with Prussian coats, in what could be seen as a mockery of the time and fabric saving measures, full turn-backs were retained in the skirts but they were actually sewn in the "open" position, meaning like the French faux turn backs they were non-functional, but still used the extra fabric and labour as a functioning turn-back - a prime example of form over function, they even featured buttons applied as decoration without a real use.

I liked this idea, and it happened to solve several problems involved with making functional turn-backs, namely the nearly three dozen button holes I'd need to construct.  I'm still not 100% on this but I'm leaning the way of non-functioning turn-backs, I just need to convince myself it's period-accurate enough - remember, these items have to be garments first, then costumes...

Anyway, enough wordy stuff, some pictures:


The finished coat with the right-hand lapel already pressed back and pinned for sewing.  You can see in this picture the divide at the centre-back of the skirt, which originally featured an additional panel to increase the skirt's volume.  I ended up removing it though as the thickness of the cotton twill shell and lining caused it to bunch and hang strangely...


The completed lining and bias bound skirt edging, featuring the "rustic" style stitching, thanks to a handy setting on my sewing machine.


And a couple more shots of the lapel pinned in place, ready to sew open should I decide to go that way.  I have some period pewter buttons on order, so I'll dry-fit these and decide whether to open all the button holes from there - more on that next time.

The Hood

I won't go into the construction of this too much here as once my mannequin head arrives from eBay tomorrow there'll be a post detailing my hood research in some more detail.

What I will say is that this one is based on my "Revolutionary Hood" pattern, constructed of cotton twill in burgundy and off-white, though my camera seems to show the red as a bright crimson.


The shape looks a little odd on my torso stand-in, mainly as I'm still using my Jelly Bean packet head stand-in.  I'll keep this brief as I want to spend some more time on the hoods next week, so here's a few pictures of where I'm up to:


The hood may or may not be permanently sewn to the coat once it's finished, but again I'm not sure on this yet.

Other Things

In other news, I've taken delivery of a couple of additional items to add to the costume - a very fine plastic training sword from Cold Steel, a katana as it happens (my weapon of choice in the AC Unity game), which I've just started to prep for paint.  The sword itself is nicely weighted but completely blunt, making it perfect for conventions.


I'll finish sanding this as and when, then I need to teach myself how to wrap Japanese sword hilts - another skill to add to the list hopefully!  Paint will be car bumper paint for better adhesion to the polypropylene plastic.

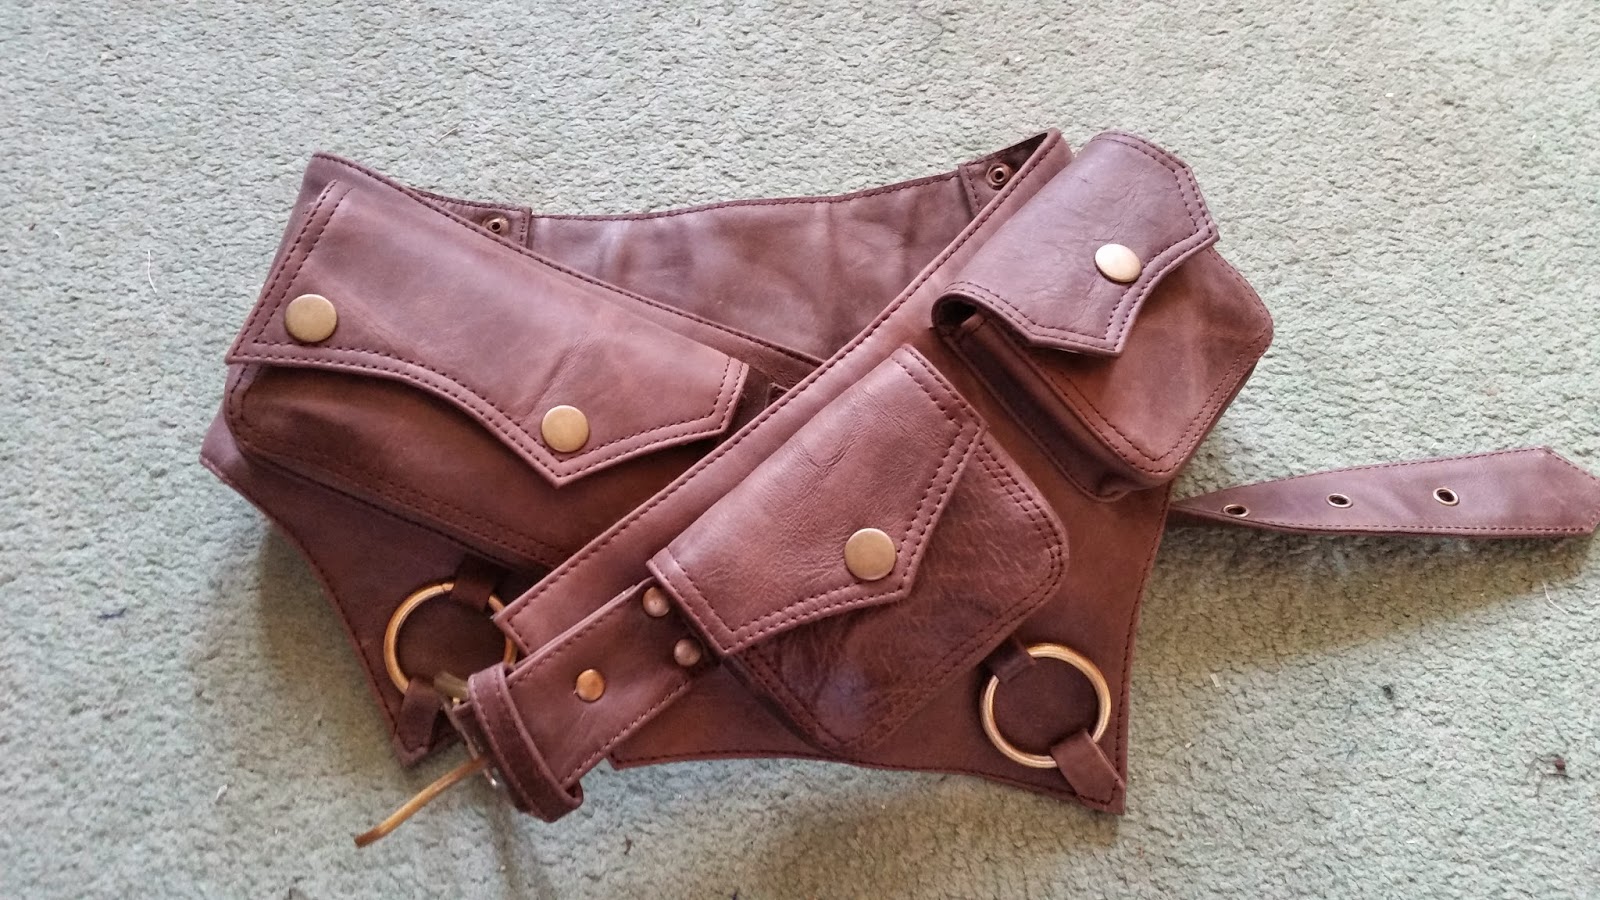
I also picked up a belt on eBay.  I'd wanted to get some leather-working under my belt soon, it's been a number of years since I've tried it out.  Unfortunately I won't have time before the next convention deadline, so picked up this item from a company called Gekko of Camden.


It's real leather, well constructed, and I think originally designed for hippies at a festival.  Still, I like it and although press studs aren't strictly period I can over-look this as it smells like leather and looks great.

So that's where we're up to for now.  The pattern pieces are cut for the other coat I need to make, ready for the mock-up fitting next week.  I'll leave it here for now as I need to eat and there's more houses to view and Real Life to catch up with.  Stay tuned for the highly-anticipated (I imagine) hood blog coming next week, along with anything else I can get done!

Until next time.


Saturday, 24 January 2015

The Wait is Over...

Hello once again dear readers and I'd like to take some time to explain my two month absence from all things frivolous and costume-based; namely, research.

Oh, you need more of an excuse than that for leaving you shivering alone in the cold, dark woods?  Oh, okay.

Let me explain then.  Pull up a seat and get a cup of tea, I'll wait, it's only fair.

Good?  Good.  Let's take a walk through how my brain works when I'm trying to make something - there are certain points I'm trying to hit whenever I put something together.  As well as looking good, I always try to ensure that my costume pieces are strongly constructed, easily maintained (machine washable for sweaty days at conventions), well fitted, true to the source material and most importantly (to me anyway) have some base in historical accuracy.

Now I'm all for weird and wonderful out-there costumes, in fact that's one of the best parts of this slightly bizarre hobby, getting to see and take part in the creativity of the costuming community, but for my work the garment needs to function as a garment first and a costume second.  This is why all of my pieces feature working button-holes, no zips or Velcro, limited use of press-studs (which, incidentally were invented in 1885) and not feature any synthetic fabrics.  Fine rules to live by I hear you say, but what the sweet baby Jesus does this have to do with a lack of blogging?

Research, that's what.  Knowing that there were a few new pieces I'd have to be making for May's Comic-Con, I needed some inspiration as to which direction to take.  As has become customary, I'd be sporting a new coat for the event, plus Scott over at www.mudbagrunner.blogspot.co.uk was in dire need of an update.  Seriously, his costume was one of the first I'd completed and it's starting to show.  Mainly because he hasn't washed it in about a year, but more for this comparison:


See the difference?  I was still finding my feet when I put Scott's costume together, adding pieces as I thought of them, inventing ways of constructing things and generally botching the whole thing. An updated, better made version was needed.  Badly.  

So, the research began.  Having just finished off Assassin's Creed Unity (buy it for the graphics and the side story, the main story-line is lazy and often boring - play Rogue instead), I started reading around the history of the French Revolution of the 1790's, a subject I had a passing knowledge of but little more outside of a computer game.  The Reign of Terror, the Sans-Culottes, Robespierre, the EnragĂ©s, the HĂ©rbertists, the Jacobin club, I really got caught up in the subject, down to the dress of the period and fashions.  It really is in interesting period of history, both the Revolution itself and the years surrounding it in terms of developments of fashion and clothing.  Indeed, the very idea of the revolutionary army being made up of the common man and woman termed sans-culottes, which translates as "without culottes," culottes being the word for the fashionable knee breeches worn by the aristocracy in 18th century France, really caught my attention. 

This led me into various avenues of enquiry, including but not limited to styles of button, the cut and cloth of the various social class's clothing, symbolism within dress and colour palettes.  Without realising it, I'd unwittingly stumbled across the idea I needed to push ahead with my next batch of costume-making.  The little 'un (on the right in the right-hand picture above) was fine, her coat, hood and shirt were all of a standard and style I was happy with, while my other half (on the left in the same picture above) could do with a new coat and corset, but neither were desperately needed.  We'd reached the conclusion that we'd buy a corset instead of me making another one, which I'm still not happy with but I lack the time and capability to make a convincing corset (so far...).

So what will I be concentrating on then?  Well, simply put, I have two new coats to make, along with two new hoods for myself and Scott.  This issue of fabric choice was always going to be a foregone conclusion, the same range of cotton drill that I normally work with, lined with either the same material or a lighter weight cotton depending on the demands of construction, as were other details, such as buttons choices and thread.  What I really needed was to choose the style and pattern to use. 

After some back and forth, I settled on Simplicity's 4923, a pattern I'd made years ago for a work Hallowe'en costume contest.  Which I won. 


I'd be using the coat from this one, which I adapted according to my taste; the two side darts were originally included on the coat, but I later remove them as they added too much bulk to the skirt section, being as I'd constructed both the shell and lining of the coat in heavyweight cotton.  The back dart was left in place, but cut down the middle to leave a divided skirt.  Alongside these changes I also modified the sleeves to remove the enormous turned-back cuffs, plus pulled them in tighter down to the wrist to reflect the historical changes in the justacourps coat going into the 18th century.  Enough talk, time for some pictures:


The complete coat, knee length and constructed of dark blue cotton twill, medium-weight interfacing through the body and lined with a cream cotton twill.  You can also see the start of the bias-binding on the edges, applied in dark blue with a "rustic" decorative stitch to hold it in place.  This was a standard setting on my sewing machine, which I applied by eye in a contrasting brown thread.  Here's a picture of the completed cuff, though the sunlight/camera flash has thrown the colours off a little:


I wanted this slightly rough and inaccurate look for the edging to give the coat a rustic feel to it; indeed in researching the style of coat I wanted I came across several pieces online describing the general crudeness and rough finish that the average man or woman's clothes would have historically - while high status pieces would impress even today's most scrupulous fashionista's, the day-to-day wear of you or I would often feature unfinished hems, raw edges and crudely executed button-holes.  For this coat I was using a roughly accurate pattern for a justacourps 18th century coat, cut in the style of the aristocracy (plus the addition of side slits and modified sleeves), but realised in more everyday fabrics and decoration.


Above you can see the back of the coat, though somewhat badly affected by the unseasonably sunny day we have today.  On the left is a picture of how the front lapels will button open and turn back once the coat is complete - this will take some time to work out exactly, but more on this once the hems are completed.  

But wait a minute, surely I've achieved more than this in the two months since my last post, right?  Right.  I've been designing hoods.  Well, I say designing, more like drawing, cutting, patterning, fitting, getting frustrated, throwing things around, drawing cutting, etc. The long and the short of it can be summed up in the following photo:


And that's not even all of them.  It's gotten to the point where I've had to name the patterns so I can tell them apart, including such delights as the "Stalker Mk.1," the "Hero Mk.2," the leather "Brute," the Mk.1 and Mk.2 "Revolution" hood, the list goes on.  I'll be featuring a few of these designs in a future blog post, just as soon as I can find and buy a freaky mannequin head to photograph them properly - laying flat you can't see the structure I've worked in to make them sit correctly.  That and you don't want a post full of pictures of my face, trust me.

Apart from that, there's been a start to Scott's new coat in the form of a divided tail section, plus the start of a side project, that may or may not see completion - I'm not entirely pleased with the set-in sleeve:


I'll leave it here for today as we've got houses to view this afternoon.  Stay tuned in the next week for the upcoming posts about whether I've achieved my goal of designing a hood that doesn't need wires to hang correctly (spoiler - I have!), plus updates featuring exciting news on buttons, sword stand-ins, belts and more.  I'll leave you with two images from my research that inspired me - note the "Revolutionary Cap" above the coat in the left image, there's a hood inspired by that and the "Sans-Culottes hood" in Assassin's Creed Unity coming...

Until next time.


Thursday, 20 November 2014

Costume Making 101 - Reasons (excuses) for a slow blog week...

1.  Applying graphics at the office


The handywork of yours truly and my friend Scott over at www.mudbagrunner.blogspot.co.uk

2.  Designing.  New Comic-Con, new coat, you know the rules. 


And the final design:


Drawn by me over prints of the pattern I plan to use, everyone's favourite, Simplicity 2333.

3.  Internet distractions of things I want.


4.  Oh, and this.


Nice cameo by the Axe-gun.  Everyone loves an Axe-gun. 


Next week will be more productive.  Honest.  In between house viewings, estate agents, finishing sequence 6 of AC Unity (buy it, buy it, buy it!) and various other things.  I think I've also started my Dishonored Corvo Attano prop purchases, so more to come on those too!

Breath. 


Until next time.