Tuesday 30 September 2014

It's All in the Details

Well, after watching some the fantastic new footage of AC Unity's customisation options over the last couple of days it's slowly dawned on me that my "secret" project that bridged the gap between blogging about coats and the present day is strangely in keeping with the style of the game...


Which pleased me.  So, I think a write up might be in order...

But not now.  Now I simply want to introduce an idea, a follow-along if you will.  Let me explain.  I recently purchased one of these from eBay for a bargain £18 including shipping:


It has to arrive from China so may be a while.  But I was thinking, I bought this because I could see potential in the design and some alterations I'd love to try.  Once this arrives I'll be documenting my progress day by day with updates, ideas and things I'm trying out to adapt it into a viable costume piece.  

Oh, and my one of these turned up today:


Cold Steel's excellent Trench Hawk Trainer axe.  It's made entirely from polypropylene and so ultimately harmless as a prop; the blade itself is around 15mm thick at the "cutting edges" and completely blunt.  My plan is to sand, sculpt and paint this up as a prop for Comic-Con (next-year) and this could be the first of many adapted costume props to come...

So, watch this space for more and that all important Space Hulk review that I keep promising.  Once my headache has FINALLY calmed down.

Until next time. 


Saturday 27 September 2014

A More Regular Blog... Of Sorts

This week I was supposed to be bringing you a review of the re-release of Games Workshop's classic boardgame, Space Hulk.  I know, I was excited too.  Then Real Life decided to dump literally every single illness on me this week - from splitting headaches to the compulsion to sleep for 22 hours a day, now through to a cold that has included nose bleeds.  Nice, huh?

So no Space Hulk review this week, in fact not a lot of anything to report - luckily though I'd managed to get a fair way through my newest Hidden Blade prop replica from Ammnra Creations before I was struck down with man-flu last weekend.

As a re-cap for anyone unfamiliar with Ammnra's work, he is a very talented designer and Cosplayer by the name of Chris Myles from the US (I forget where exactly, it's a big place and I'm still ill...), who sells prop replica kits through a 3D printing website, www.shapeways.com.  The company uses an SLS (selective-laser sintering) printing process whereby a super-fine nylon powder is laser-formed one tiny layer at a time to create 3D objects that can be painted and finished like any other plastic model kit.  When you have a spare minute check out Shapeway's website and have a search for Ammnra's store, it's an amazing process.

One word of warning, 3D printing is still a relatively niche market for the general public and can be a pricey hobby to start up.  You have been warned...

On to the kit itself, this is the second Assassin's Creed 3 hidden blade kit I've purchased, the first being (briefly) documented in a previous blog post.  I won't get into the construction and assembly of the finished prop now as the photos are pre-varnish and not ready to be assembled, but here's what I have so far...


The kit in it's closed state.  For anyone interested the base colours for the entire project are very simple; Plati-kote's Flat Black as a base coat, Silver for a covering colour and Brass for the gold elements.  The variations in silver are achieved through Games Workshop's Devlan Mud and Badab Black ink washes applied in various quantities.


The base tier and slide: both painted in Flat Black, then over-brushed with silver.  A few ink washes later and some Silver dry-brushing and edge highlights, we have this.  A close up of the "dream-catcher" detail at the back end, the different silver tones achieved through varying the number of ink washes used.


The knife elements, separately and assembled.  The final picture is missing the small locks that hold the blade in place when deployed.


Here we have the assembled dry run, the top picture showing the sliding tier extended but with the knife blade retracted, the second with the blade deployed and showing off the swivel mechanism for the knife handle.  Nifty huh?


Some glam shots of the dry-assembled pieces in the closed position.  Note the silver ribbing in the bottom photo - to achieve this result the handle was painted Flat Black then heavily dry-brushed in Silver.  The grooves between the ridges were then re-painted Flat Black by hand to give a clean look.  weathering was added using some brown acrylic paint I had lying around. 


And a final couple of shots of the Hidden Blade fully extended.  Please note that this prop is entirely made of plastic and completely incapable of causing harm.  The knife blade is blunt and will bend and snap before causing injury, safety first people.  As a reference, the kit is just over 10" long when closed and around 21.5" when fully extended.

So that's it for today, I'm off back to bed to sleep off the last of this man-flu.  Stay tuned for more Things Falling Out of My Head as an when I feel a bit better.


Until next time.


Sunday 21 September 2014

Things Falling Out of My Head...

Hello again to you, dear reader, and another chance to catch up with the various musings and other things that have been tumbling, seemingly without cease, from my head.

So where were we up to?  Ah yes, the long brown coat.  You see I ask because in Real Life in the Real World, I write these blogs retrospectively rather than as I'm constructing, tinkering and altering.  Whilst this allows for quick write-ups and a wealth of projects to draw on, it does also have the downside of me having to write a lengthy blog on what I've been doing, sometimes several weeks after the fact.

Add to this I'm a complete bloody magpie when it comes to finding something new and shiny to attract my attention, it does mean that finding time to blog can be tricky...

What does this mean for my beloved (if somewhat neglected) blog?  Well, the winds of change are circling in the East, the air calls of needed change and focus...  Insert another Tolkien-sounding reference here if you wish but for the rest of us, let me explain.

What was needed, I decided after several glasses of red wine, were shorter, sharper, more up-to-date posts detailing my projects as they happen - you know, cutting edge style.  So, I'm not going to dwell on the long coat much longer (as it was actually finished around three or four months ago and is now looking for a new home, offers welcome...), suffice to say it's done:


In fact, more done than that - and because I'm fickle, the final reveal will accompany my October Comic-Con review in a few weeks.  So there.

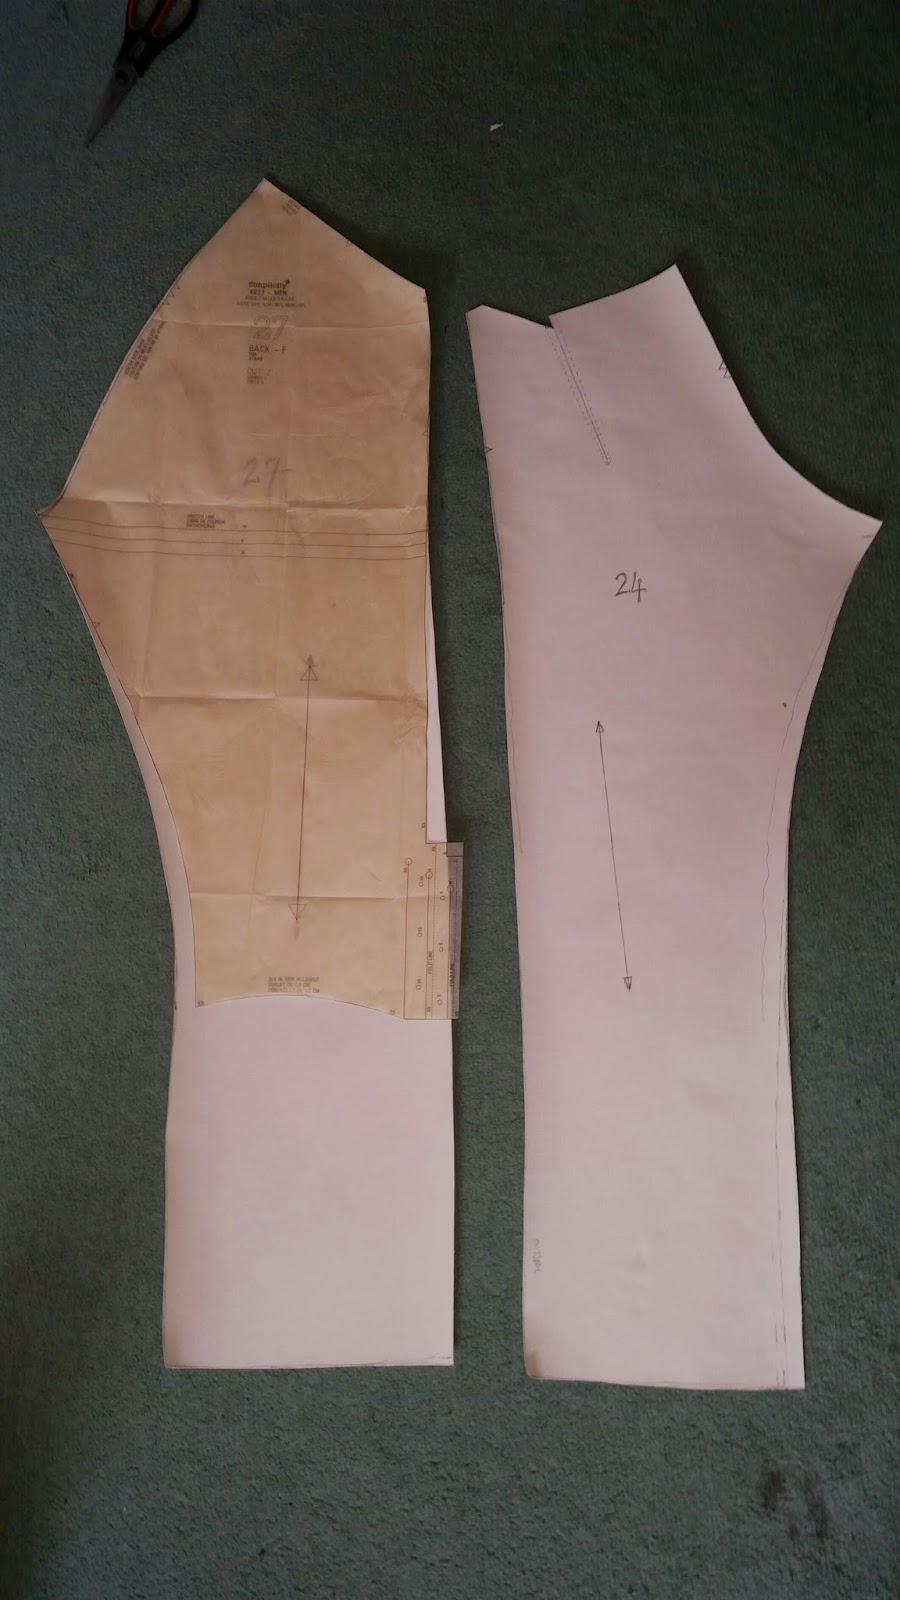
So then, what else has been occupying my time and making me bad at writing blogs?  Well, for some reason I decided I needed to commit heresy and try pattern out some flap-fronted trousers.  As regular readers will know, trousers (like shoes) are made of magic and zips.  Well, shoes don't have zips, but you get the point.  I had a pattern for a short pair of knee-breeches lying around, so I thought I'd see how hard it was:


Which went rather well, and then got put aside in favour of watching YouTube videos (check out Thatcher Joe's channel, in particular his walkthrough of Outlast, great looking game and brilliant commentary - Parkour!) and doing some design work for a new costume project:


What else?  Well, I started playing Thief on the Xbox, decided I wanted to make a Thief costume and started designing it.  I'll provide the designs at a later date for anyone who wants them, but for now I'll use it as an illustrative point for how my mind works.  

Then, I made this:


Much more to come on this one; I won't be covering the construction in detail but will provide pattern references and details of the changes made.  Keep an eye on this, I've got some fun additions and changes to come with this little project.

In other news, I was lucky enough to get a copy of this bad boy:


Add to this my painting of the Hidden Blade prop kit and various other sundry work and hopefully you see my predicament; documenting everything when each day is a stolen half hour here, 45-minutes there...  Plus the day job, family and a new Les Mills Combat DVD that's kicking my arse five days a week before work. 

So then, here's where we stand as far as the projects and Real Life go.  I'll be updating whenever I can albeit in somewhat shorter but more frequent blogs, still centered around costuming and prop-making, but also covering subjects such as painting, the odd film recommendation and some design-work on the side.  For those of you still reading I appreciate it no-end and I'll endeavour to keep the content coming, but more regularly and in a less Biblical length each time.  I'm aware this blog is long, so don't think it's clever to point out the irony.

While I'm at it. be sure to check out a couple of other blogs I'd like to promote:

www.jcbishopart.blogspot.com - for arty things, make-up and various other girly things, written by the creative little bunny I live with.

www.ovoxolauren.blogspot.com - for musings and reviews by a tall girl.  There's a lot more to it than that, but I'm sure Lauren would be happy with that description. 

Stay tuned y'all, there'll be another entry very soon, this time covering everyone's favourite re-issued board game from the Nineties - the classic Space Hulk by Games Workshop.  I don't care if you don't like it, I frigging love it.  

So there. 


Saturday 6 September 2014

Costume-making 101: The End Drawers Nigh(er)

Hello again and following a hectic few weeks of Real Life getting in the way of the important business of costume-making and then writing blogs about it, we're back in business and ready to finish up the latest item in my dressing-up box: the brown Assassin's Creed overcoat.

So when we finished up last time I'd discovered the arcane art of sewing machine embroidery - witchcraft I tell you - to decorate my projects.  I'd tried a test piece on a scrap of my corduroy fabric and it had gone quite well, look:


I'd planned to use this piece in my completed coat, but after drawing in the cutting lines I realised how wonky the design was - I didn't mind the roughness of it, after all it's supposed to look hand embroidered, but my OCD wouldn't let me use a design that was off centre and tilted.  I also wanted to use some kind of backing to give the piece some more body.

Breaking out my denim lining material I cut out the piece of fabric I needed to the correct size and shape (more on the hood pattern to come...) and started to mark out the design.  It was based on the eagle emblem found on Connor's hood in Assassin's Creed 3, with some modification.  Typically, I didn't take a photo of the completed marking out, just the completed piece, but following the marking out I pinned the lining to the outer corduroy and starting embroidering...


It's hard to see in the photo but after drawing out the pattern I marked points along each of the lines where i needed to adjust the width of the stitching to create the taper - for example on the outer lines of the "wings" I started out at a width setting of 4 (out of 6), then around a third of the way down  turned this down to 3, the for the final third down to 2.  The 2 setting seemed to be thin enough to define the points without being too thin to see properly.


 Here's the design from the front - ignore the bumps, they came out following liberal use of a hot iron.  Once completed I cut around the denim pattern piece around 6mm out and again with the use of the trusty steam iron turned over the edges to create a neat piece ready to add to the hood.  Going against my belief of not using glue to create costumes, I glued these raw edges down as they were quite small an fiddly.  the result?


I was pretty pleased with the result, but thought it could use some more definition.  So, back onto the sewing machine, it was time to add a line of stitch around the whole design:


A small detail, but I think it really helped define the design.  I put this aside for now along with the rest of the hood pattern to complete later.


So, back to the coat then and time to start adding some buttons.  I ignored the original pattern as far as the button placement was concerned as I wanted to pin the lapels back on themselves with a row of buttons.  After playing around with button placement and numbers I settled on a design I was happy with and started opening the buttonholes, following the method in previous entries:


Next, the buttons themselves.  For rows such as this the method I've developed to ensure a flat, even row is to first place the top button of the row, then the bottom one, making sure the placement allows the lapel to lay flat when turned back.  Once turned, I used pins to mark the location of the remaining buttons, along with a tape measure to ensure they were a uniform distance apart:


Sew, sew, sew, more hand sewing buttons in place and we end up finally with the finished article!


The coat tails in the final picture are held up through two buttonholes opened up in the lower edge, allowing the coat to be worn either long or "for marching," as this design is described in military clothing design manuals, or, my particular favourite as "in the French style."

So, coat done, yes?  No, actually.  I still need to add more buttons (really?) to the cuffs, plus complete the hood, which I've mentioned a lot but still haven't shown you how to make.  I'll cover these next time, along with some glamour shots of the finished coat.  Right now I have to finish photographing the current coat I'm working on, ready for a future blog post...


Until next time.